Track attendance on site with Excel and Power Automate
With Ubiqod, you can collect data from a wireless time clock, connected buttons or QR codes. Connectors make it possible to send this data to almost any third party software. In this tutorial, we will learn how to use Ubiqod’s webhooks to send data to Excel online through Microsoft Power Automate.
Our target: track attendance on site with Excel
For the purpose of this tutorial, we will create a system to track attendance of workers on a site. Each time the worker is on site, she/he will scan a QR code on site and press “Arrive”. We will use a PIN code in order to ensure that nobody else could do that. When leaving, she/he will scan the same QR code and press Depart with PIN code confirmation.
We will send data collected on site to Excel in real time.
This tutorial is intended to be basic and can be used as a base to build a more complex system, using RFID time clock, adding geofencing or using QR code badges to identify workers on site.
Before you start: requirements
Before using this connector, ensure that you:
Log in to a Ubiqod account or register a new one (you will get 100 credits to test the platform)
Validate your email and connect to your Ubiqod account
Have a valid Microsoft Power Automate licence (You can check https://make.powerautomate.com/, should be included in your Office 365 licence)
Configure Ubiqod

Create a PIN code list
As everybody can scan a QR code on site, we will protect it with PIN code. We can give a PIN code per user, but for the purpose of this tutorial, we will use a general PIN code.
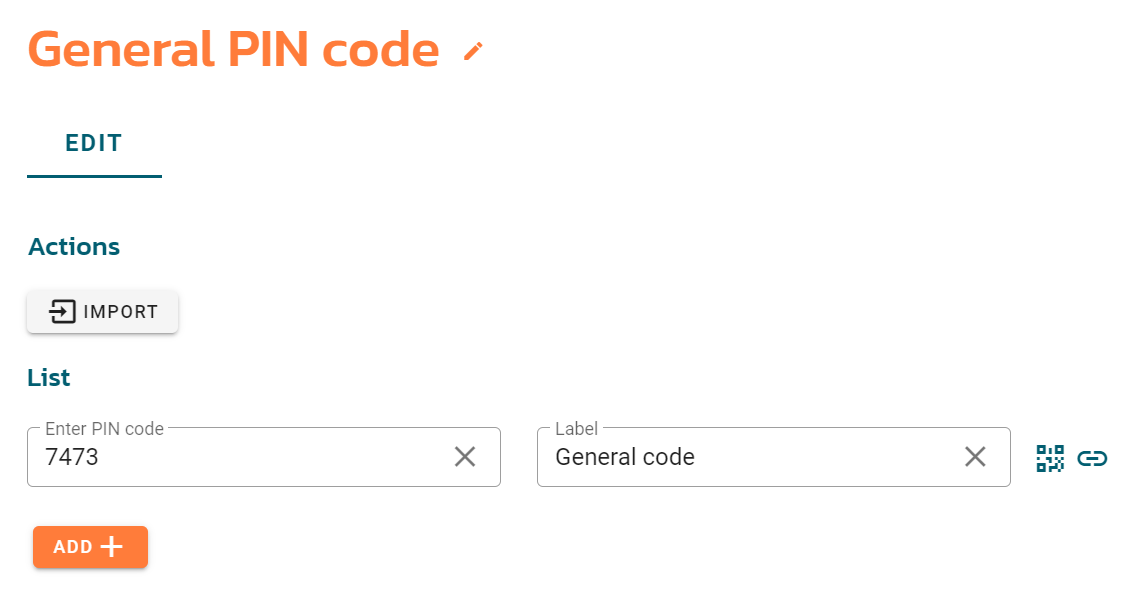
To create a PIN code list, go to the Interfaces menu. In the PIN CODES LISTS tab, press + CREATE button.
In the Label field, name your PIN codes list (for instance, General PIN code).
Add the PIN code 7473 with label General code.
Your screen should look like this:
Press the + CREATE button at the right bottom of the page.
Create an interface
The interface is the web page where the user will be redirected to after scanning the QR code (called QOD on the platform). The platform includes a No Code builder that makes it easy to set up an interface for most of the use cases.
To create an interface, go to the Interfaces menu (INTERFACES tab) and press + CREATE button.
Choose a Single Choice interface.
In the Label field, name your interface (for instance, Excel Tutorial Interface).
In the EDIT tab, create two button:
One with label Arrive and reference 1
One with label Depart and reference 2
Choose the colors you like for each button.
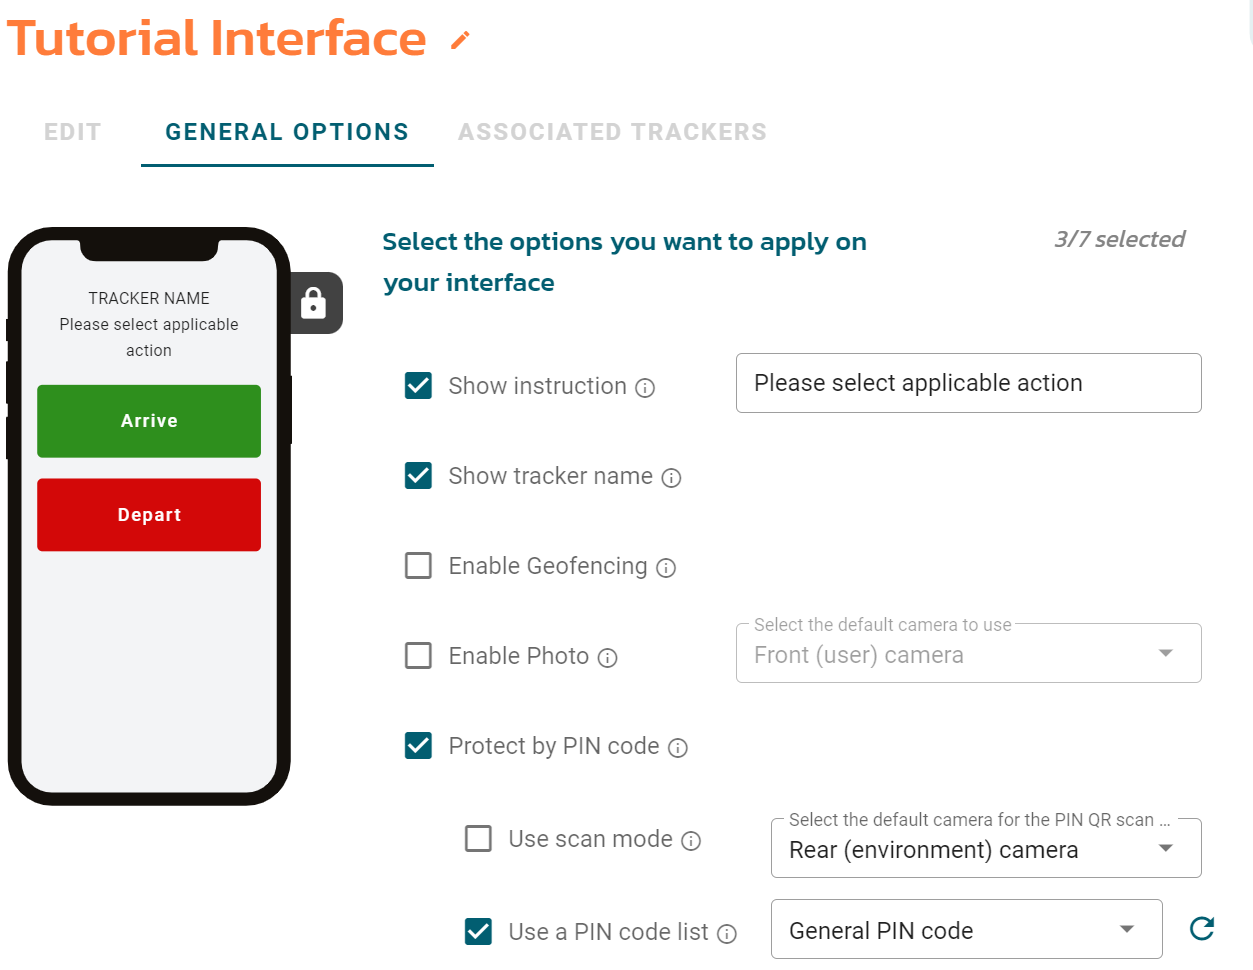
In the GENERAL OPTIONS tab, select Protect by PIN code. Select the PIN code list created at the last step. Ensure that Use a PIN code list option is checked.
Optionally, you can add the tracker name (will be replaced by the label of each tracker) and instructions.
Your screen should look like this:
Press the + CREATE button at the right bottom of the page.
Our interface and PIN code list can now be associated with any tracker (QR code). If you manage 100 sites, you can re-use the same interface and PIN code list for all of them. Now, let’s create our sites and associated trackers.
Create a site
Each tracker (in our case, we will use a QR code) can be placed in a site.
To create a site, go to the Sites menu and press the + CREATE button.
In the Label field, name your site, for instance, Demo Site.
You can enter an address or GPS coordinates of the site.
Press the + CREATE button at the right bottom of the page.
Create a tracker
You can see a tracker as a point of interaction between a place and a human. Here, we will use a QR code, but you can apply the same method if you want to configure a RFID time clock or a secured QR code (Ubiqod Key).
To create a QR code tracker, go to the Trackers menu, in the QODS tab, and press the + QOD button.
In the Label field, name your site (for instance, QR code for Tutorial).
Select the interface and the site created previously. Leave the disptach empty.
Your screen should look like this:
![]()
Press the + CREATE button at the right bottom of the page.
Our QR code is ready, and you can try it as if you were a worker by scanning it (click on the tracker you created to see the QR code). At this stage, everything is ready except one important thing: how can we send the information to Excel. This is what we will be doing now through Microsoft Power Automate.
Create you destination Excel File
We will create an online Excel File to track times in real time. Each time that a worker will clock in or out on site, we will add a new line to the file automatically.
For the purpose of this tutorial, we will create an online Excel file in OneDrive Business. You can also use Sharepoint if you prefer.
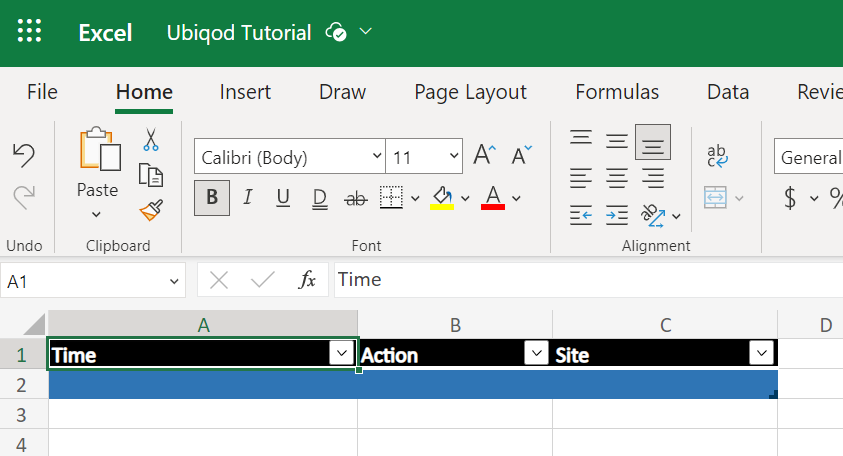
We will add 3 columns :
A time column, which will indicate when the action occured
An Action column, indicating if the worker arrived or left at that time
A Site column, to know where the action occured
You also need to convert your workbook into table, following this tutoral: https://learn.microsoft.com/en-us/troubleshoot/power-platform/power-automate/unable-to-find-excel-online-table-in-microsoft-flow
Your screen should resemble this (the exact colors aren’t important):
Configure Power Automate
Create a trigger
Navigate to Microsoft Power Automate at: https://make.powerautomate.com/
In the + Create menu, choose Automated cloud flow.
When the dialog box Build an automated cloud flow appears, click on the Skip button.
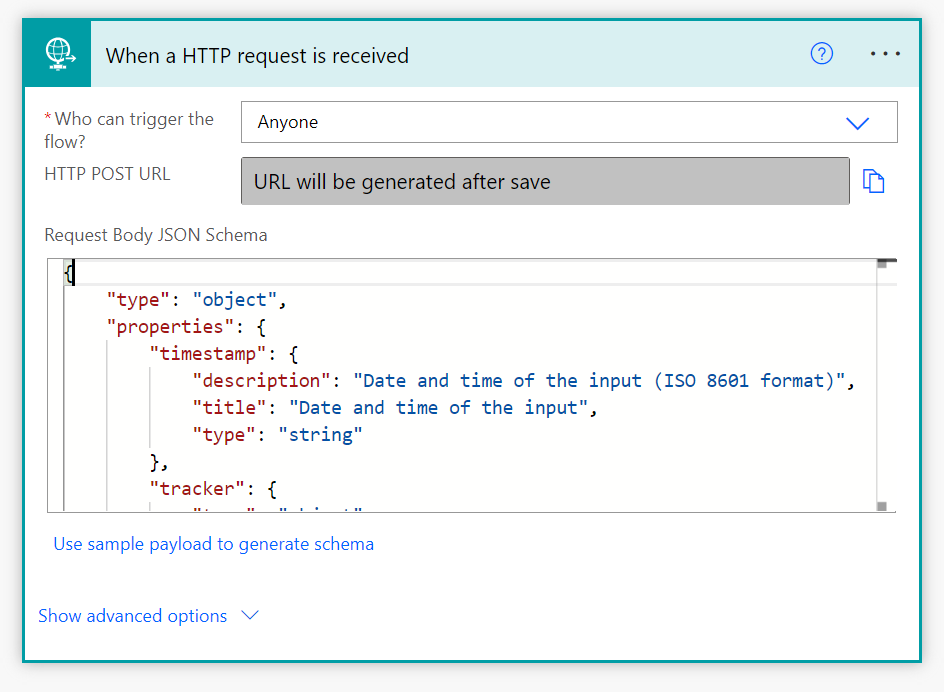
In the search box, search for and select the trigger When an HTTP request is received.
In Who can trigger the flow, select Anyone.
In the Request Body JSON Schema, copy and paste the code available here: https://storage.googleapis.com/skiply-prod-ubiqod/schemas/ubiqod_hook_def.json
Don’t be affraid of this code: you don’t need to understand it. It contains the definition of the available fields, you will see how important it is in the following steps.
Your screen should look like this:
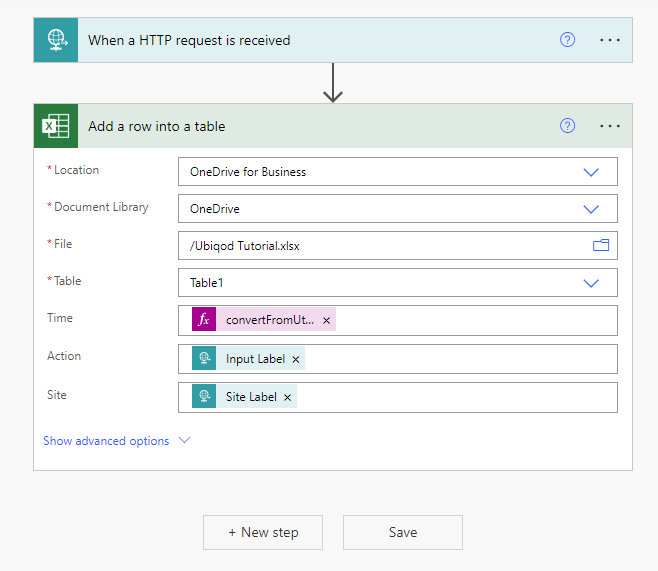
Click on the New step button.
In the Choose operation box, select Excel Online (Business).
Select the Add a row into a table action.
Select your workbook, using the Location, Document Library, File and Table rows.
For each row, we have to do a mapping between what we want to display in the Excel file, and the data provided by Ubiqod.
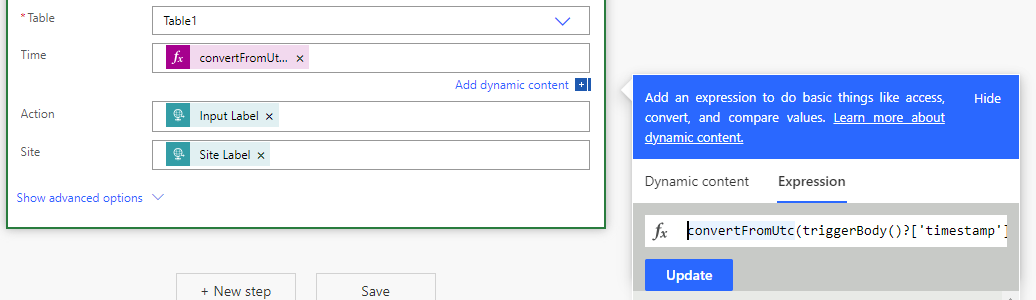
Time column
We will map the Time column with a formula that will convert the timestamp sent by Ubiqod into a formatted date. In our example, we will enter this in the expression tab (second tab when you click on the Time row):
convertFromUtc(triggerBody()?[‘timestamp’],’Romance Standard Time’,’g’)
For references, here is the complete list of time zones in Power Automate: https://zeitgeistcode.com/timezones-table/
The available date formats are explained here: https://learn.microsoft.com/fr-fr/troubleshoot/power-platform/power-automate/how-to-customize-or-format-date-and-time-values-in-flow
Action column
We will map the Action column with the label of the button configured previously in our interface. In the dynamic content tab (appears when you click on the Action Row), search and select Input Label.
Site column
We will map the Site column with the label of the button configured previously in our interface. In the dynamic content tab (appears when you click on the Action Row), search and select Input Label.
Your screen should look like this:
Click on the Save button
Now that our Microsoft Power Automate Flow is set up, the final step is to establish a connection between Ubiqod and Power Automate.
Make the link between Ubiqod and Power Automate
Creating the dispatch
When you save your Microsoft Power Automate Flow for the first time, a URL will appears in the Trigger When a HTTP request is received. Copy this URL. It should start with something similar to: https://xxx.yyy.logic.azure.com:443/workflows/
In Ubiqod, go to the Dispatch menu. Click on the + CREATE button.
Select Webhook.
In the Label field, name your dispatch (for instance, Tutorial Power Automate).
Paste the URL from Power Automate in the Webhook URL field.
We will filter data, sending the clock in and out signals only when the PIN is recognized.
For this, in the General Options tab, tick Data Filter.
Click ADD + button.
Select User Code, and The user code is recognized.
Press the + CREATE button at the right bottom of the page.
Each tracker associated with this dispatch will now send data to our Power Automate flow.
Associate the tracker
To associate one or many trackers to a disptach, go to the Trackers menu.
Select the trackers you want to associate with our dispatch.
Click on Assign dispatches in the icon bar.
Select our Power Automate Dispatch:
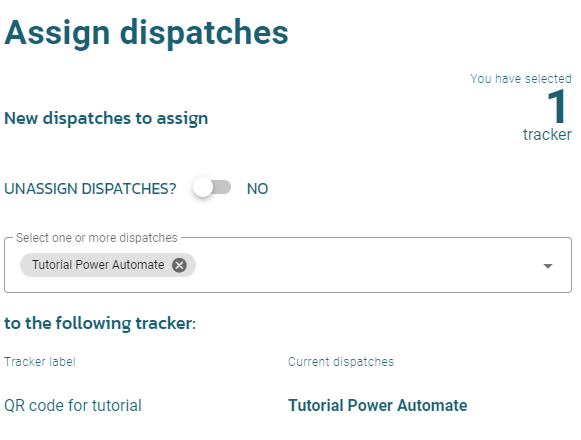
Click on the Assign to one tracker button.
We are ready to test our App.
Test Out Your New App
Now, every time you scan the QR code of your tracker and enter the correct PIN code, the action you select will be added to your Excel workbook.
Congratulations!
Taking It One Step Further
Geofencing
You can try the geofencing feature. Just active the filter Geolocation on site in the Dispatch Options.
Worker identification
You have several possibilities to identify the workers on site if it is something you need:
Personnal PIN code
Create as many PIN code as workers in your PIN code list, and set the names of the workers in the label field. Then, add an Employee column in your Excel File and map it with Code Label: for each valid input, you will see the associated employee.
QR code bades
You can facilitate identification by using the QR badge feature: the employee will have to scan a personnal QR code instead of entering a PIN. This option must be enabled in the interface settings. Personnal QR codes are provided for each code of the PIN code list.
Smartphone recognition
In both cases, the Remember The PIN code feature, available in the General Options of the Interfaces, can help to maximize efficiency. If activated, the PIN code will be asked only one time during the period of your choices. Then, it will be stored on the smartphone. Next time the worker will scan the code, he will only have to select the action (Arrive / Depart).
Use of IoT
The same can apply to connect devices like Clock S or Clock R. Contact us if you need RFID time clock for your needs.
Mass printing
If you have serveral sites, you can mass print the trackers. Select them in the trackers list and click on the printer icon to check the result.
Integration into complex Apps
This tutorial is an introduction to the possibilities of Ubiqod with Power Automate. Within the Microsoft ecosystem, you can build much more complex and integrated apps using SharePoint, Power Apps, and VB.